

This step-by-step guide provides detailed instructions on how to enable Simple Network Management Protocol version 3 (SNMPv3) on Cisco Firepower Device Manager (FDM) version 7.7.0 using the REST API. SNMPv3 offers enhanced security features, including authentication and encryption, making it the preferred choice for modern network monitoring. By leveraging the REST API, administrators can efficiently configure SNMPv3 settings on FDM-managed devices, ensuring secure and automated management of network infrastructure.
Prerequisites for configuring SNMPv3 on FDM
Requirements:
Before proceeding, ensure you are familiar with the following:
- Firepower Threat Defense (FTD) managed via Firepower Device Manager (FDM) version 7.7.0
- Basic understanding of REST API functionality
- Working knowledge of SNMP
Components Used:
- Firepower Threat Defense (FTD) managed by Firepower Device Manager (FDM) version 7.7.0
Procedure:
1. Access the FDM API Explorer
To access the FDM REST API Explorer from the FDM GUI, select the 3 dots and then API Explorer

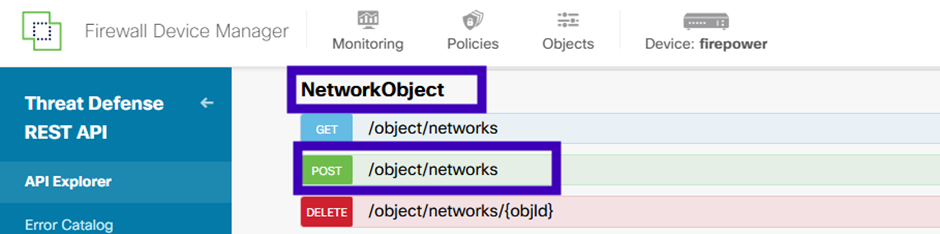
2. Network Object Config
Create a new network object for the SNMP host. On FDM API Explorer, select NetworkObject and then POST /object/networks:
The SNMP Host JSON format is this. Paste this JSON into the body section and change the IP address on value to match the SNMP host IP address:
{
“version”: “null”,
“name”: “snmpHost”,
“description”: “SNMP Server Host”,
“subType”: “HOST”,
“value”: “192.168.100.100”,
“isSystemDefined”: false,
“dnsResolution”: “IPV4_ONLY”,
“type”: “networkobject”
}
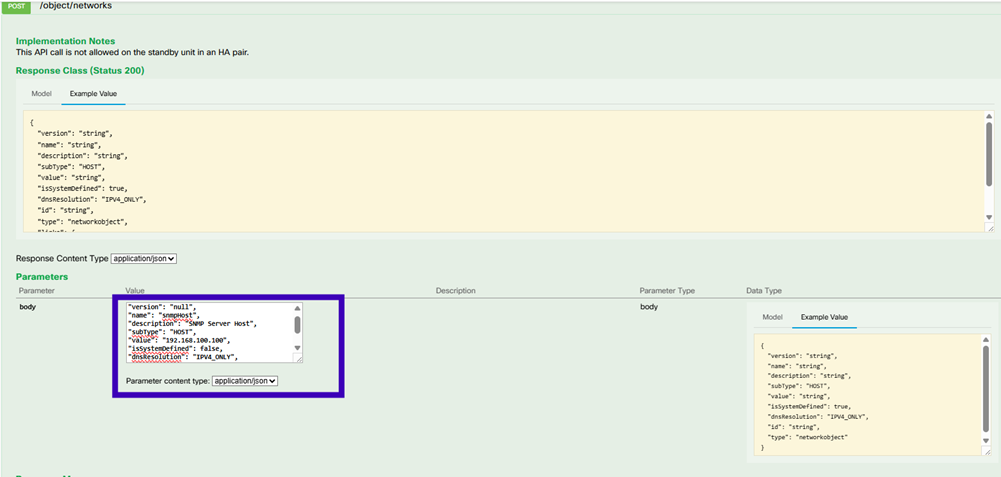
Scroll down and select the TRY IT OUT! button to execute the API call. A successful call returns Response code 200.

Copy the JSON data from the response body to a notepad. Later, you need to fill out the information about the SNMP host.
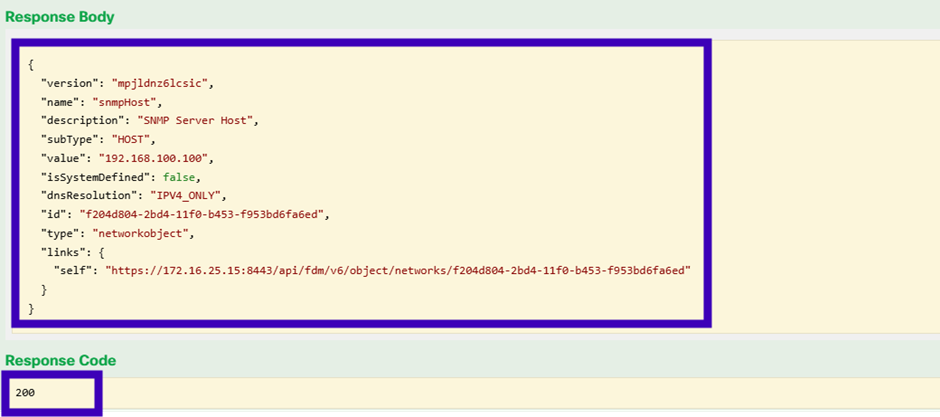
We will need to save the version and the id to use it later:
Version: mpjldnz6lcsic
Id: f204d804-2bd4-11f0-b453-f953bd6fa6ed
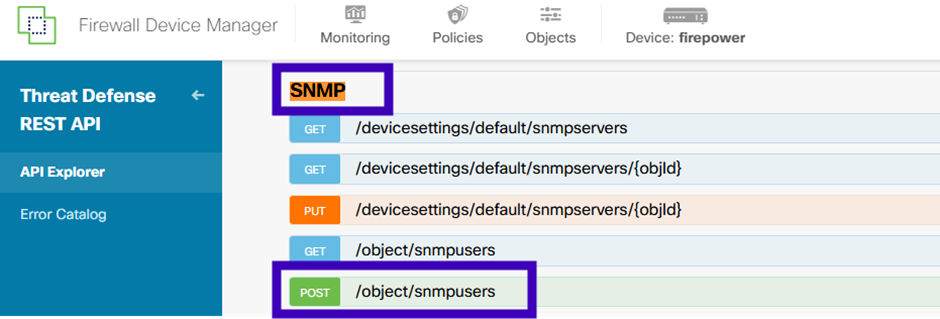
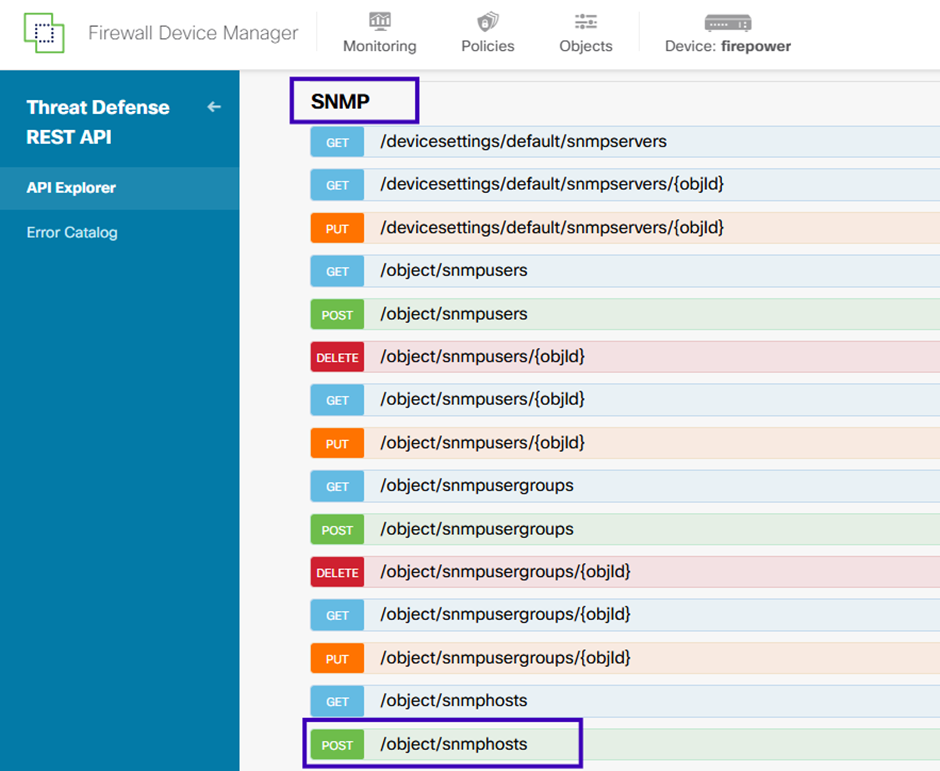
3. Create a new SNMPv3 user
On FDM API Explorer select SNMP and then POST /object/snmpusers
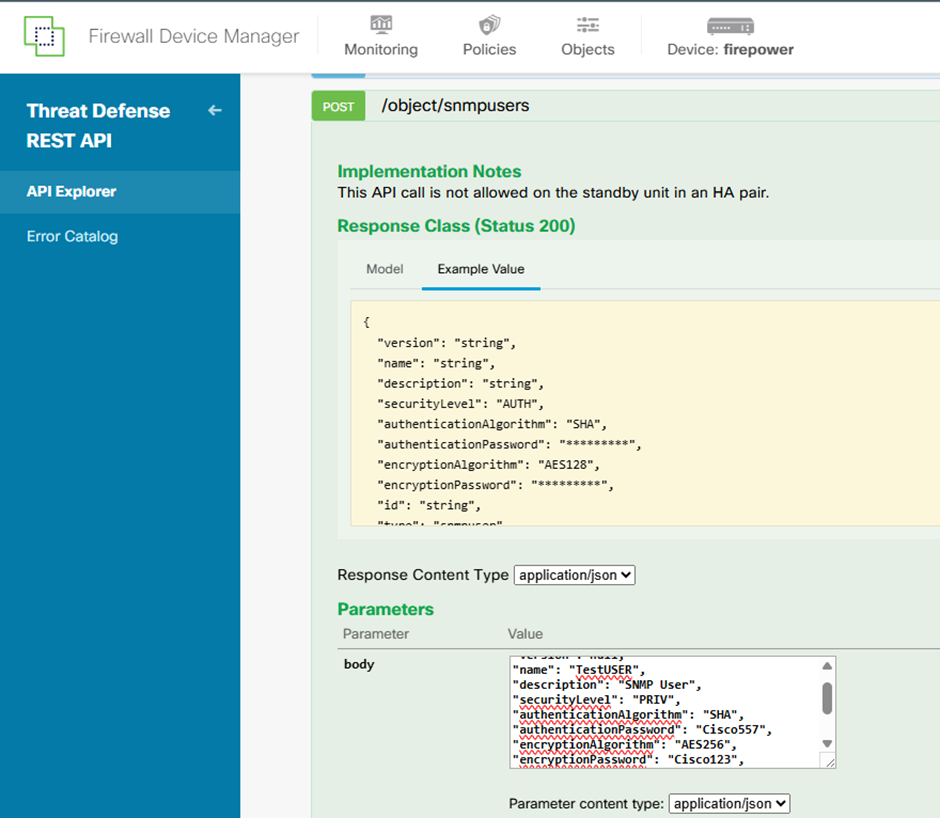
Copy this JSON data to a notepad and modify the sections that you are interested (for example, name, authenticationPassword, encryptionPassword or the algorithms):
{
“version”: null,
“name”: “TestUSER”,
“description”: “SNMP User”,
“securityLevel”: “PRIV”,
“authenticationAlgorithm”: “SHA”,
“authenticationPassword”: “Cisco557”,
“encryptionAlgorithm”: “AES256”,
“encryptionPassword”: “Cisco123”,
“id”: null,
“type”: “snmpuser”
}
The passwords shown in these examples are for illustrative purposes only. In a production environment, always use strong, unique passwords that adhere to security best practices.
Copy the modified JSON data to the body section:
Scroll down and select the TRY IT OUT! button to execute the API call. A successful call returns Response code 200. Copy the JSON data from the response body to a notepad. Later, you need to fill out the information about the SNMP user.
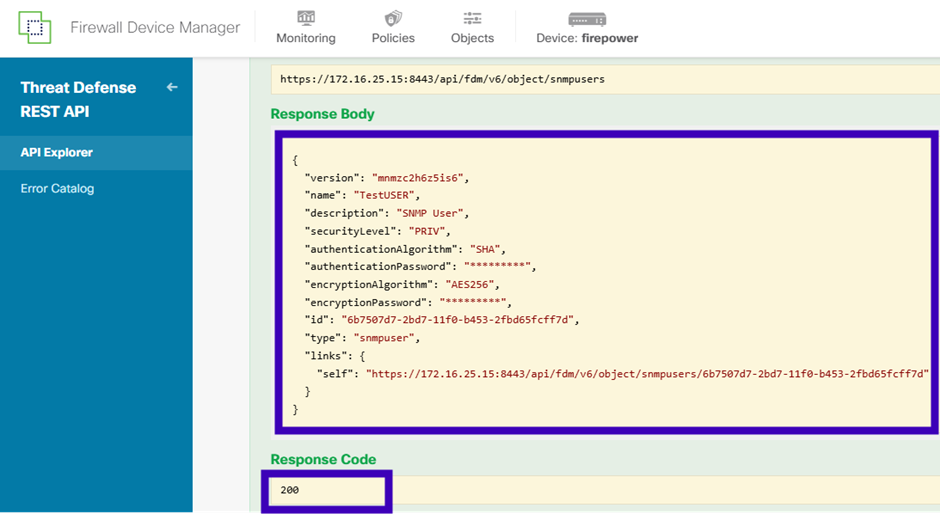
We will need to save the version and the id to use it later:
Version: mnmzc2h6z5is6
Id: 6b7507d7-2bd7-11f0-b453-2fbd65fcff7d
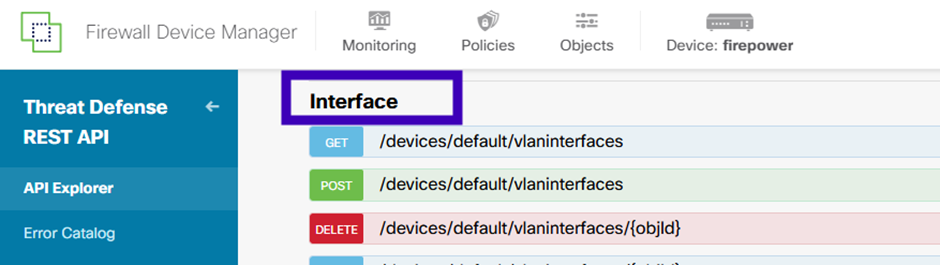
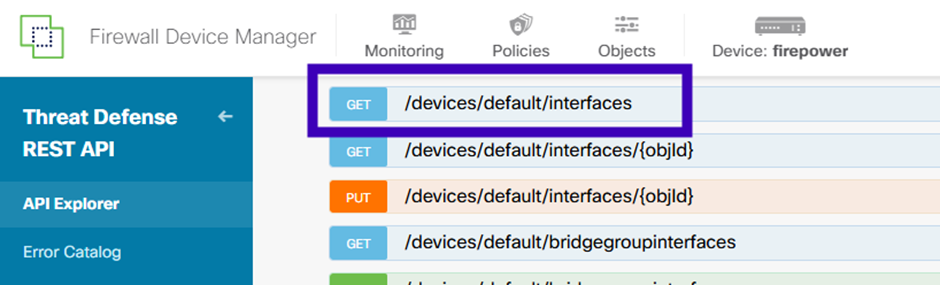
4. Get interface information
In this lab, we are utilizing the default interface (Ethernet1/1), designated as ‘Outside’.
Within the FDM API Explorer, navigate to the ‘Interface’ section and execute the GET request at /devices/default/interfaces. Retrieve the configuration details for the interface connected to the SNMP server.”
Scroll down and click the TRY IT OUT! button to execute the API call. A successful request will return a response code of 200. Copy the JSON data from the response body and save it in a text editor for reference. You will use this information later to complete the interface configuration.
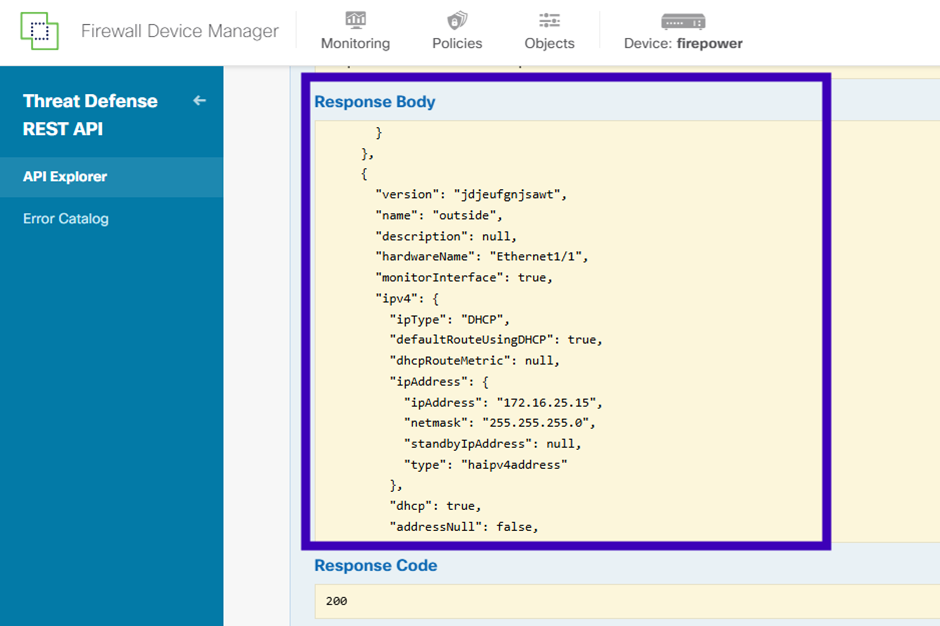
Save the interface version, name, id, and type from the JSON data.
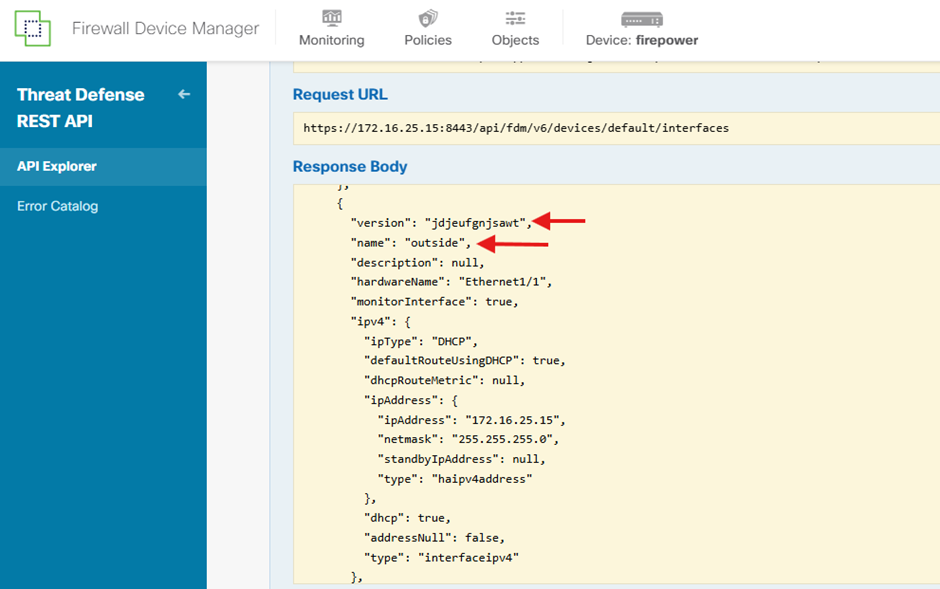
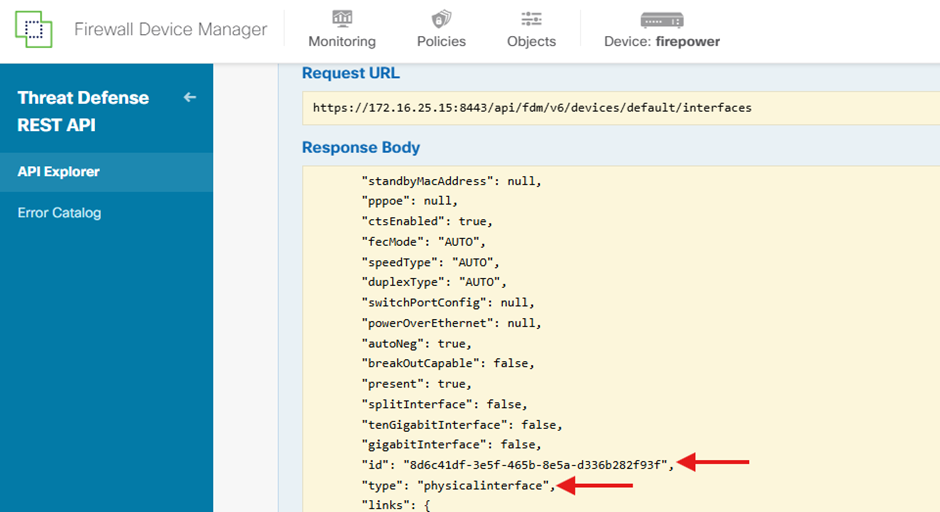
From the JSON response, identify the relevant details of the ‘Outside’ interface that must be associated with the SNMP serve:
- version: jdjeufgnjsawt
- name: outside,
- id: 8d6c41df-3e5f-465b-8e5a-d336b282f93f,
- type: physicalinterface,
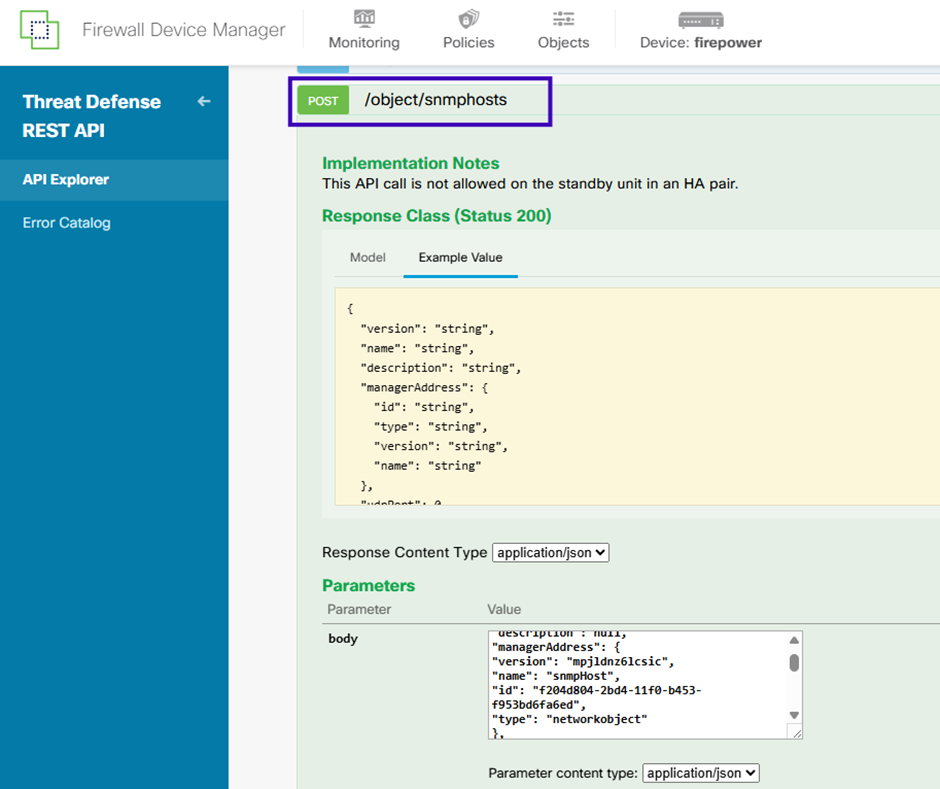
5. Create a new SNMPv3 host:
On FDM API Explorer, select SNMP and then POST /object/snmphosts/ under SNMP.
Use the following JSON as a template. Populate it with the appropriate values obtained from the previous steps by copying and pasting the relevant data into the corresponding fields:
{
“version”: null,
“name”: “snmpv3-host”,
“description”: null,
“managerAddress”: {
“version”: “bsha3bhghu3vmk”,
“name”: “snmpHost”,
“id”: “1d10ce6d-49de-11eb-a432-e320cd56d5af”,
“type”: “networkobject”
},
“pollEnabled”: true,
“trapEnabled”: true,
“securityConfiguration”: {
“authentication”: {
“version”: “bmwzw4iw7php7”,
“name”: “snmpUser”,
“id”: “65da6c50-49df-11eb-a432-e7823944dabc”,
“type”: “snmpuser”
},
“type”: “snmpv3securityconfiguration”
},
“interface”: {
“version”: “kkpkibjlu6qro”,
“name”: “inside”,
“id”: “fc3d07d4-49d2-11eb-85a8-65aec636a0fc”,
“type”: “physicalinterface”
},
“id”: null,
“type”: “snmphost”
}
Note:
Replace the value in managerAddress id, type, version, and name with the information you received from Step1.
Replace the value in authentication with the information you received from Step 2.
Replace the value in interface with the data you received from Step 3.
After replacing the collected data the template will be same as below:
{
“version”: null,
“name”: “snmpv3-host”,
“description”: null,
“managerAddress”: {
“version”: “mpjldnz6lcsic”,
“name”: “snmpHost”,
“id”: “f204d804-2bd4-11f0-b453-f953bd6fa6ed”,
“type”: “networkobject”
},
“pollEnabled”: true,
“trapEnabled”: true,
“securityConfiguration”: {
“authentication”: {
“version”: “mnmzc2h6z5is6”,
“name”: “TestUSER”,
“id”: “6b7507d7-2bd7-11f0-b453-2fbd65fcff7d”,
“type”: “snmpuser”
},
“type”: “snmpv3securityconfiguration”
},
“interface”: {
“version”: “jdjeufgnjsawt”,
“name”: “outside”,
“id”: “8d6c41df-3e5f-465b-8e5a-d336b282f93f”,
“type”: “physicalinterface”
},
“id”: null,
“type”: “snmphost”
}

Scroll down and select the TRY IT OUT! button to execute the API call. A successful call returns Response code 200.
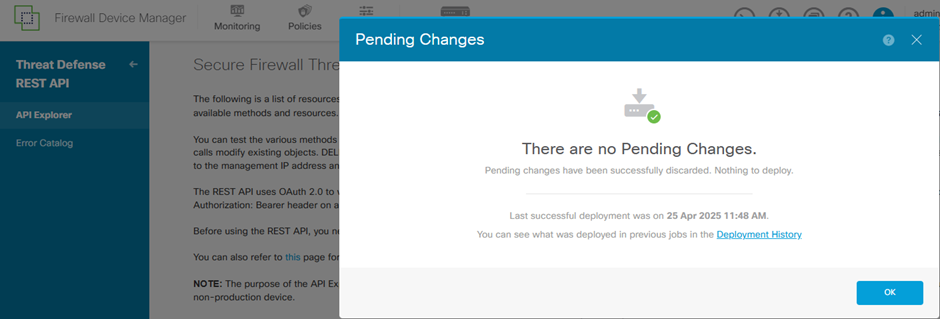
6. Deploy the changes:
Once all previous steps have been completed successfully, return to the FDM GUI and deploy the changes to apply the configuration.
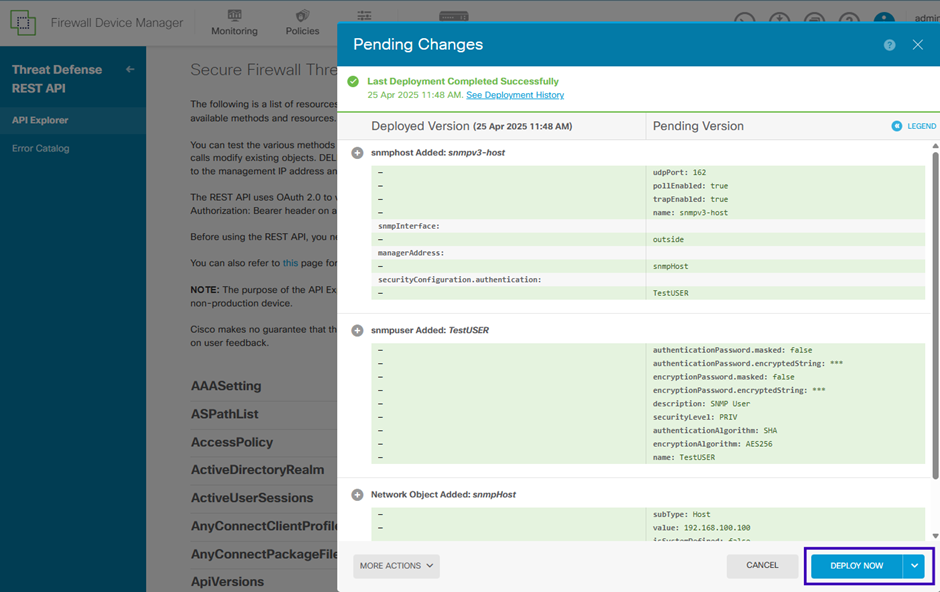
Successful deployment will be as below:
Enabling SNMPv3 on Firepower Device Manager (FDM) version 7.7.0 using the REST API ensures a secure and efficient approach to network monitoring and device management. By following the steps outlined in this guide, administrators can implement robust SNMPv3 configurations that support authentication, encryption, and access control—key components of a resilient network infrastructure. With SNMPv3 in place, organizations benefit from improved visibility, stronger security, and streamlined operational control across their Cisco environments.